
Crochet Star-wrap Blanket
- jessrootknots

- Dec 17, 2023
- 6 min read
I try my best to avoid plastic plants around the house because I have this blurry memory of my mum telling me when I was little that "fake plants bring fake relationships". I honestly have no idea where that came from, but as mothers have the superpower to persuade children even with nonsense, I kept it in my system as I grew up.
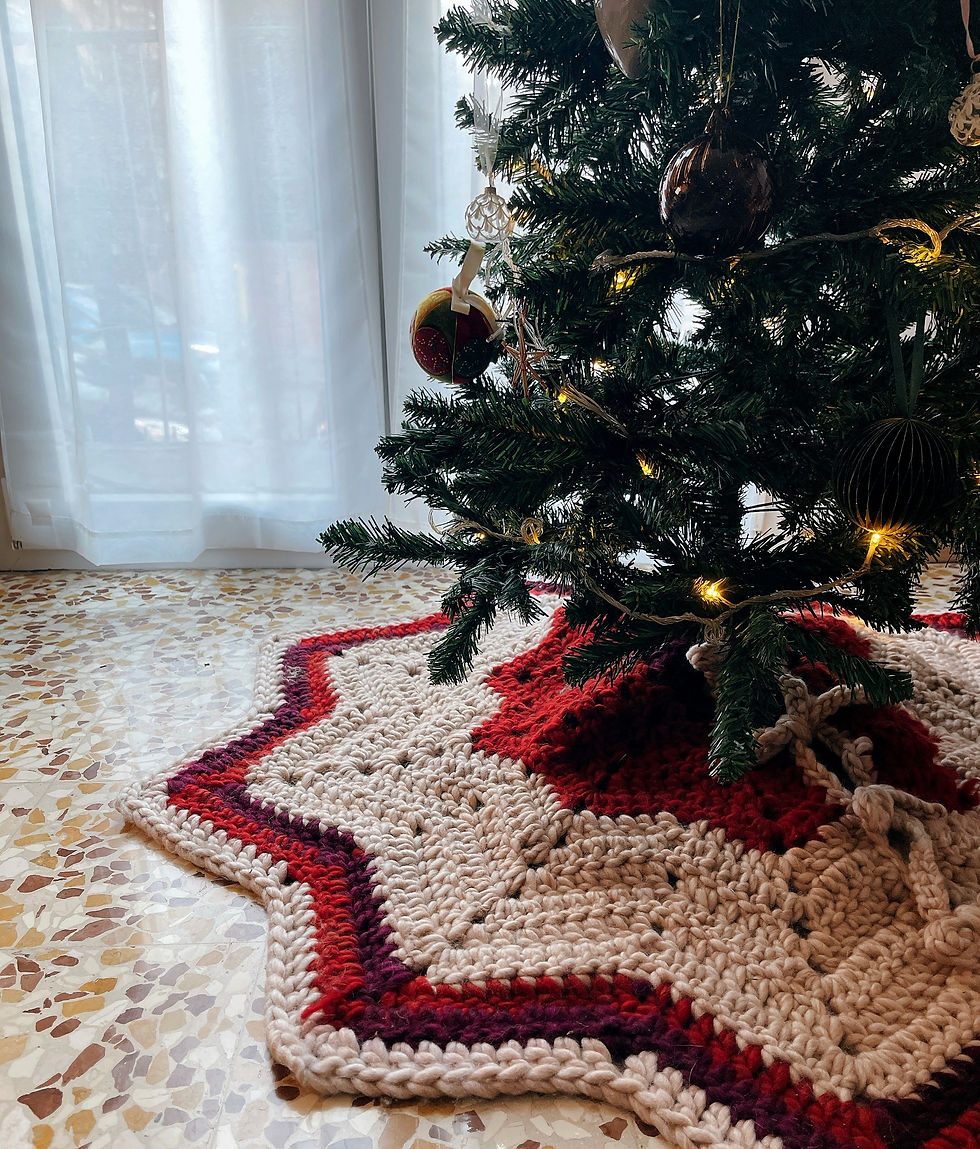
With that being said, guess what the first Christmas tree I've ever owned is made of? That's why I am making all the effort to make this crochet blanket to hide those pesky metal legs.
Luckly, I have Hobbii invited me to try out their Udon yarn right in the same time. With its super bulky weight and 12 mm crochet hook, I have finished the project less than 4 days. And now I have a nice thick wool mix cussion around my holiday symbol of the house.
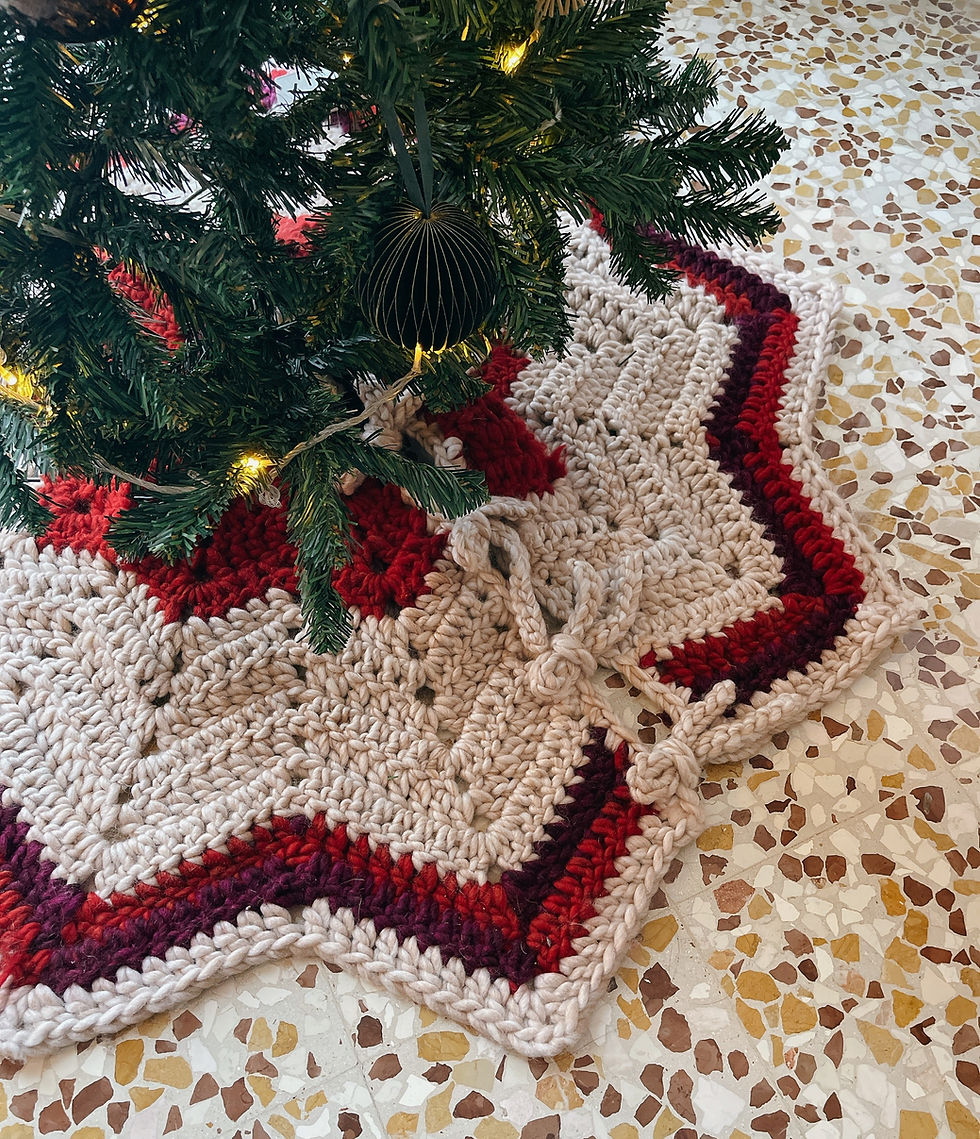
The blanket is in a opened 9 points star shape with a small whole in the center. The hole is made to hold the tree trunk and the opening allows us to wrap it around the tree like a poncho. I am completely in love with this extra warmy touch I made for my tree. So, if you too are feeling that your tree is shivering a bit with those bare metal/plastics legs, let me show you how I keep mine warm!

Materials / Tools
Yarn - Udon from Hobbii Yarn. I used the color (from left to right) Ochre, Cranberry and Off white
Crochet Hook 12.00mm
Yarn needle
Scissors
Pattern Instructions
In the following instructions I will simply refer to the colours I used for my blanket as colour 1, 2 and 3. And I'll only show it when there's a change of colour. Feel free to go crazy with your favourite holiday palette!
Row 1 (color 1): CH9, 2DC in the next 4 ST, 1DC in the next ST, 2DC in the next 4 ST. Turn. [17]
Row 2 : CH5 (count as DC and CH2), DC in the first ST. *SK1, (DC, CH2, DC) in the next ST. REP from * until the end. Turn.
𖠱 We should have 9 V-stitches (DC, CH2, DC) at the end of Row 2, with 1 compelet V-stitch both at the begining and the end.
Row 3 (color 2): SL ST in the CH2 SP. *2DC, CH2, 2DC in the CH2 SP. REP * until the end. Turn.
𖠱 From now on, we will call this (2DC, CH2, 2DC) arrangment "big spark ST". After Row 3, we should have 9 big spark STs.
Row 4: SK the first DC, SL ST in the second DC, CH3 (count as first DC). (2DC, CH2, 2DC) in the CH2 SP. DC in the next ST. *SK the next 2 ST. DC in the next ST. (2DC, CH2, 2DC) in the CH2 SP. DC in the next ST. REP from * until the end. Leave the last ST unworked. Turn.
Row 5: SK the first DC, SL ST in the second DC, CH3 (count as first DC). DC in the next ST. (2DC, CH2, 2DC) in the CH2 SP. DC in the next 2ST. *SK the next 2 ST. DC in the next 2ST. (2DC, CH2, 2DC) in the CH2 SP. DC in the next 2ST. REP from * until the end. Leave the last ST unworked. Turn.
𖠱 Pay attention that for Row 6, we are going to work a "small spark ST " in the CH2 SP. Which means we put (DC, CH2, DC) into the CH2 SP intead of (2DC, CH2, 2DC).
Row 6 (small spark row): SK the first DC, SL ST in the second DC, CH3 (count as first DC). DC in the next 2ST. (DC, CH2, DC) in the CH2 SP. DC in the next 3ST. *SK the next 2 ST. DC in the next 3ST. (DC, CH2, DC) in the CH2 SP. DC in the next 3ST. REP from * until the end. Leave the last ST unworked. Turn.
For the rest part of this pattern, we will have 2 rules to follow:
We always SK the 2 ST at the lowest point of our starts
Every 2 big spark ST rows, we make 1 small spark ST row.

With these principles in mind, let's continue with our blanket!
Row 7: SK the first DC, SL ST in the second DC, CH3 (count as first DC). DC in the next 2ST. (2DC, CH2, 2DC) in the CH2 SP. DC in the next 3ST. *SK the next 2 ST. DC in the next 3ST. (2DC, CH2, 2DC) in the CH2 SP. DC in the next 3ST. REP from * until the end. Leave the last ST unworked. Turn.
Row 8 (color 3): SK the first DC, SL ST in the second DC, CH3 (count as first DC). DC in the next 3ST. (2DC, CH2, 2DC) in the CH2 SP. DC in the next 4ST. *SK the next 2 ST. DC in the next 4ST. (2DC, CH2, 2DC) in the CH2 SP. DC in the next 4ST. REP from * until the end. Leave the last ST unworked. Turn.
Row 9 (small spark row): SK the first DC, SL ST in the second DC, CH3 (count as first DC). DC in the next 4ST. (DC, CH2, DC) in the CH2 SP. DC in the next 5ST. *SK the next 2 ST. DC in the next 5ST. (DC, CH2, DC) in the CH2 SP. DC in the next 5ST. REP from * until the end. Leave the last ST unworked. Turn.
Row 10: SK the first DC, SL ST in the second DC, CH3 (count as first DC). DC in the next 4ST. (2DC, CH2, 2DC) in the CH2 SP. DC in the next 5ST. *SK the next 2 ST. DC in the next 5ST. (2DC, CH2, 2DC) in the CH2 SP. DC in the next 5ST. REP from * until the end. Leave the last ST unworked. Turn.
Row 11: SK the first DC, SL ST in the second DC, CH3 (count as first DC). DC in the next 5ST. (2DC, CH2, 2DC) in the CH2 SP. DC in the next 6ST. *SK the next 2 ST. DC in the next 6ST. (2DC, CH2, 2DC) in the CH2 SP. DC in the next 6ST. REP from * until the end. Leave the last ST unworked. Turn.
Row 12 (small spark row): SK the first DC, SL ST in the second DC, CH3 (count as first DC). DC in the next 6ST. (DC, CH2, DC) in the CH2 SP. DC in the next 7ST. *SK the next 2 ST. DC in the next 7ST. (DC, CH2, DC) in the CH2 SP. DC in the next 7ST. REP from * until the end. Leave the last ST unworked. Turn.
Row 13: SK the first DC, SL ST in the second DC, CH3 (count as first DC). DC in the next 6ST. (2DC, CH2, 2DC) in the CH2 SP. DC in the next 7ST. *SK the next 2 ST. DC in the next 7ST. (2DC, CH2, 2DC) in the CH2 SP. DC in the next 7ST. REP from * until the end. Leave the last ST unworked. Turn.

For the next two rows, I changed and mixed colours 1 and 2 as I changed the angle to form my star like in the picture
Row 14 (color 1 and 2): SK the first DC, SL ST in the second DC, CH3 (count as first DC). DC in the next 7ST. (2DC, CH2, 2DC) in the CH2 SP. DC in the next 8ST. *SK the next 2 ST. DC in the next 8ST. (2DC, CH2, 2DC) in the CH2 SP. DC in the next 8ST. REP from * until the end. Leave the last ST unworked. Turn.
.
Row 15 (small spark row) : SK the first DC, SL ST in the second DC, CH3 (count as first DC). DC in the next 8ST. (DC, CH2, DC) in the CH2 SP. DC in the next 9ST. *SK the next 2 ST. DC in the next 9ST. (DC, CH2, DC) in the CH2 SP. DC in the next 9ST. REP from * until the end. Leave the last ST unworked. Turn.
Row 16 (color 3): SK the first DC, SL ST in the second DC, CH3 (count as first DC). DC in the next 8ST. (2DC, CH2, 2DC) in the CH2 SP. DC in the next 9ST. *SK the next 2 ST. DC in the next 9ST. (2DC, CH2, 2DC) in the CH2 SP. DC in the next 9ST. REP from * until the end. Leave the last ST unworked. DO NOT cut the yarn.
We are now standing at the conor of the opening. We are going to make a SC edging with color 1 while adding the strip to tie up the blanket.

Step 1: From where we finish Row 16, put another SC in the DC just made. Turn the work so we are working along the side of our opening. SC in the side of the first DC.
Step 2: CH15, SL-ST in the second CH and each CH ST across.
Step 3: 7SC evenly on the side of the DC rows.
REP Step 2 and Step 3 until finish the last strip and reach back to the center of the blanket. Fasten off.
REP the same steps for the other side of the opening.
Weave in all the yarn ends and your Christams wrap blanket is done! ☺
I hope this project gives you a little extra softness on your holiday. I wish you a very merry Christmas and a great new year. I'll see you around. ;)


Comments